Service Manager powered by HEAT
Navigating Through Ivanti
•About the Ivanti Self-Service Portal
About the Ivanti Self-Service Portal
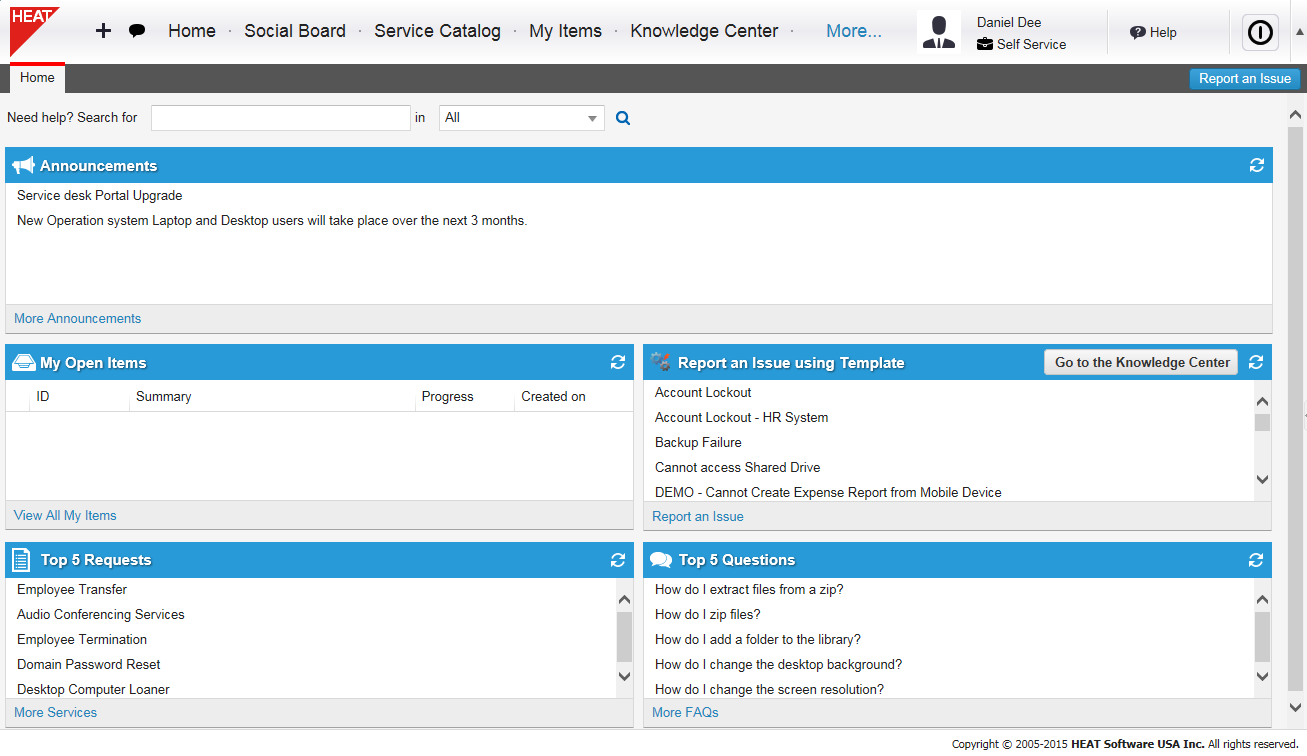
After logging into Ivanti Service Manager, you see the Self-Service Portal
Self-Service Portal
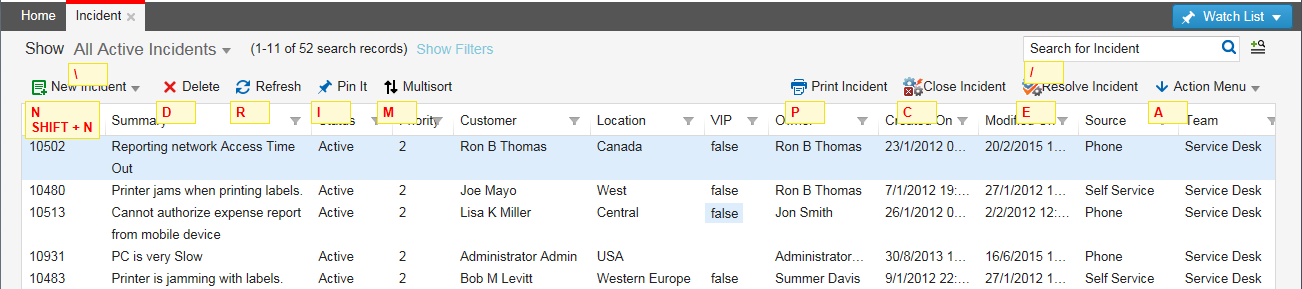
When you view a workspace, a list of records appears, similar to the following:
Sample Workspace View

Your interface might look different based on the settings provided by your administrator. For example, the colors and the exact modules might not be the same as shown above.
Using Mobile Devices
Ivanti Service Manager can be used on most mobile devices, including tablets and smart phones, through a browser. All procedures described in this online help apply to mobile devices.
Using iPads and iPhones
Ivanti Service Manager is available as a free app from the Apple store to enable iPad and iPhone users to interact with the database. See Using the Mobile Client App.
Main Workspace Parts
Top Header Bar for the Self-Service Portal

Top Header Bar for Administrators

The top header bar has the following components:
•Workspace drop-down list
•Social Board button
•Workspace selectors
•More workspace selectors
•User log in name and role
•Settings. Click the user name to change your password, locale, or picture
•Configuration Console
•Online help
•Logout button
Other areas include the following:
•Top tab bar, with workspace tabs
•Dashboard selector (on Home workspace)
•Watch list
•Page title
•Search area
•List toolbar, with Action Menu
•List
•Record preview
Workspace Footer Bar
The workspace footer bar has the following components:
•Page size selector
•Page number selector
•Previous and next arrows, first page and last page buttons
•Refresh button
•Record details

Tabbing Between Fields
Once in a form, you can tab from one field to the next. The exact tab order is set by the administrator.
Starting from the top of the form, you can tab through the controls in the header, then enter the first field in the Detail form.
Press Tab to go forward and Shift + Tab to go backwards through the fields.
Using Keyboard Shortcuts
•Previewing the Keyboard Shortcuts
•Browser-Specific Keyboard Shortcuts
•Creating and Modifying Keyboard Shortcuts
About Keyboard Shortcuts
Ivanti Service Manager has many keyboard shortcuts for navigating around the toolbars. Using keyboard shortcuts (and without using the mouse), you can perform searches, navigate through the application, create new incidents, run quick actions, and more.
These keyboard shortcuts are specific to Ivanti Service Manager and do not interfere with the keyboard shortcuts in your web browser. The keyboard shortcuts are consistent across languages, and only use English characters.
The keyboard shortcuts use two modifiers: either Alt or Ctrl + Shift. You can use either modifier. You cannot configure the modifier.
For Mac users, the Alt key is also called the option key.
By default, tab access is disabled in the Safari web browser. To enable it, go to Preferences > Advanced and select Press tab to highlight each item on a page.
In addition to the keyboard shortcuts, you can also use the up arrow, down arrow, page up, and page down keys on your keyboard.
If you are in a read-only control where you cannot enter any text, such as a list view, you do not need to use a modifier. You can just click the keyboard shortcut without the modifier and achieve the same result.
Keyboard shortcuts apply to the active panel, which is where the cursor is. The available shortcuts vary depending on which panel the cursor is in.
Previewing the Keyboard Shortcuts
To preview the keyboard shortcuts, hold down the Alt key; however, this does not work if you are in an HTML field. You may need to refresh the page if the keyboard shortcuts are not displayed.
Browser-Specific Keyboard Shortcuts
The following keyboard shortcuts are used by one or more web browsers:
•Alt-Tab
•Alt-F
•Alt-E
•Alt-V
•Alt-A
•Alt-T
•Alt-H
•Alt-B
Do not create new keyboard shortcuts using these letters. If you create a new keyboard shortcut and use one of these letters, the system could potentially implement either the browser-specific shortcut or the user-defined shortcut.
Creating and Modifying Keyboard Shortcuts
You can create new keyboard shortcuts and edit existing ones for quick actions, including the default keyboard shortcuts that are part of the default Ivanti Service Manager system.
If you create a new toolbar item, but do not specify a keyboard shortcut, the system creates a default shortcut which is the first unique letter of the label that is not reserved by a standard, reserved, or overridden shortcut, and uses ALT as the modifier.
Follow these steps to create a new keyboard shortcut:
1.From the Configuration Console, click Build > Page Layouts to open the Page Layouts workspace.
2.Select a layout. The system opens the Edit Layout page.
3.Click gridView. The List View Editor opens.
4.Click edit next to the toolbar area. The Toolbar Editor opens.
5.Click any toolbar item. The Toolbar Button Editor opens.
6.Enter a letter in the Shortcut field. You can only assign one letter or number to a shortcut. You cannot assign special characters.
7.Click Save to close the Toolbar Button Editor.
8.Click Save to close the Toolbar Editor.
9.Click Save from the toolbar.
Common Keyboard Shortcuts
Toggle
| Keyboard Shortcut | Action |
|---|---|
| Alt+T | Toggles between the active panel and the toolbar. |
Top-Level Menus
| Keyboard Shortcut | Action |
|---|---|
| Alt+W | Opens the More... menu from the top-level header bar. This is where you see all the workspaces available to you. This does not work from inside dashboards. |
Business Object Workspaces
These keyboard shortcuts may or may not be available, depending on the specific business object workspace.
| Keyboard Shortcut | Action |
|---|---|
| Alt+A | Opens the Action Menu. |
| Alt+C | Closes the record. |
| Alt+D | Deletes the record. |
| Alt+G | Opens the Go To... menu. |
| Alt+H | Posts a message to the Social Board with the record. |
| Alt+I | Pins the record to the watch list. |
| Alt+L | Shows the list view. |
| Alt+N | Creates a new record. |
| Alt+Shift+N | Shows the New... menu, which allows you to create a new record from a template. |
| Alt+P | Adds a problem to the record. |
| Alt+R | Refreshes the workspace. |
| Alt+Q | Requests a change. |
| Alt+T | Prints the record. |
| Alt+U | Attaches an issue and resolution article. |
| Alt+/ | Opens the quick search menu. |
| Alt+\ | Opens the saved search menu. |
| Alt+Tab | Moves to the next control. |
| Alt+Shift+Tab | Moves to the previous control. |
Keyboard Shortcuts in a Workspace
List View
All keyboard shortcuts available in the business object workspaces, plus the following additional keyboard shortcuts:
| Keyboard Shortcut | Action |
|---|---|
| Alt+D | Deletes a record. |
| Alt+E | Resolves the record. |
| Alt+P | Prints the record. |
Form View
| Keyboard Shortcut | Action |
|---|---|
| Alt+C | Closes a record. |
| Alt+D | Deletes a record. |
| Alt+H | Shares the record. |
| Alt+L | Opens the list view. |
| Alt+S | Saves the record. |
| Alt+Shift+ right arrow | Moves to the next record. |
| Alt+Shift+left arrow | Moves to the previous record. |
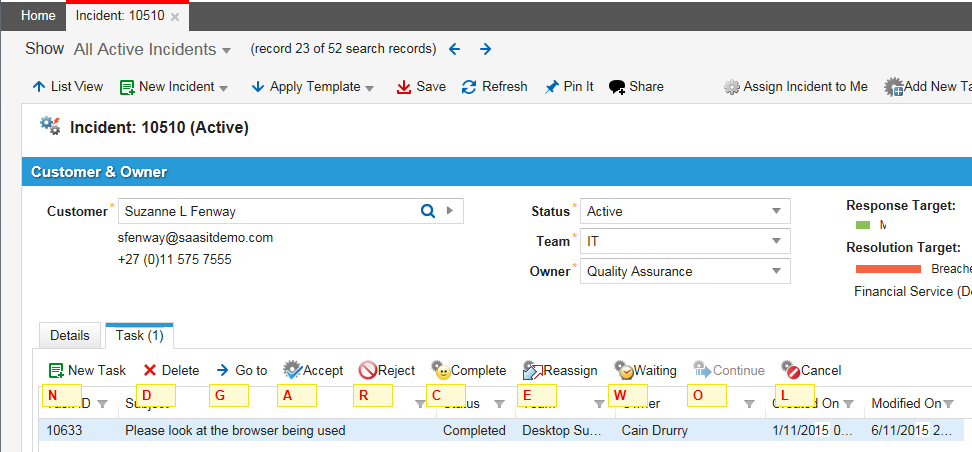
| Alt+Shift+K |
Used for forms that have tabs. Moves to the next child panel or header form. This is the same as clicking on the next tab. For example, in the screen below, if you are currently viewing the Details tab, if you click Alt+Shift+K, you move to the Resolution Details tab.
If you are already viewing the last tab, clicking Alt+Shift+K opens the list of additional tabs. This is the same as clicking the + button on the right (not shown above). |
| Alt+Shift+J | Moves to the previous child panel or header form. This is the same as clicking on the previous tab. |
| Tab | Moves to the next control. |
| Shift+Tab | Moves to the previous control. |
| Tab | Moves the navigation from the list of tabs to inside the child panel. |

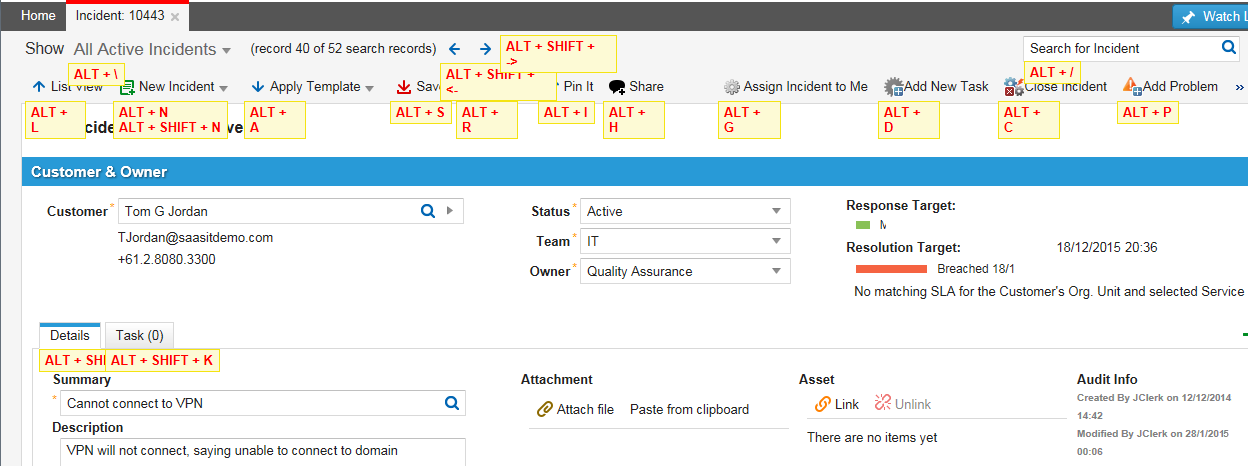
When you are in a read-only control where you cannot enter any text, such as the child panel below, you do not need to use a modifier. You can just click the keyboard shortcut without the modifier and achieve the same result. For example, below, if you click N in the incident list, the system displays the New Incident window. If you click Alt+N, the system also opens the New Incident window.
Keyboard Shortcuts in a Read-Only Child Panel
However, if you are in a child panel that is not read-only, which means you can enter data into the form, as shown below, you must use a modifier. Below, if you click Alt+N, the system opens the New Problem window. You cannot access the New Incident form from here.
Keyboard Shortcuts in a Not Read-Only Child Panel
Popup Menus
| Keyboard Shortcut | Action |
|---|---|
| Esc | Closes the popup menu without saving the data. |
| Ctrl+Enter | Saves the data and closes the popup menu. |
| Tab | Moves to the next control. |
| Shift+Tab | Moves to the previous control. |
Using Full-Screen Mode
You can hide the top header bar by entering full-screen mode. (This is different than pressing F11 on your keyboard. When you press F11, you still see the header bar with the top-level tabs.) In full-screen mode, you do not see the header bar and top-level tabs; you only see the current business object record or workspace. This is useful when you need to display more vertical space, such as if you are working in 1024x768 where there is limited vertical space.
1.To the right of the Log in button, click the small upward pointing triangle. The system displays the full screen confirmation window.
2.Click Allow to enter full-screen mode.
3.Press ESC on your keyboard to get out of full-screen mode.
Was this article useful?
The topic was:
Inaccurate
Incomplete
Not what I expected
Other
Copyright © 2017, Ivanti. All rights reserved.